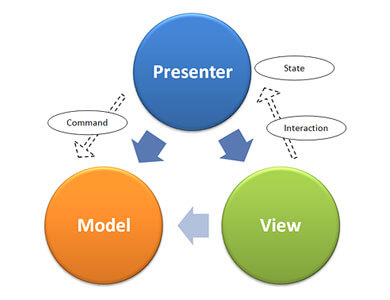
در بخش اول این مطلب آموزشی با مفاهیم اولیه Model View Presenter آشنایی پیدا کردید و در بخش دوم نحوه پیاده سازی آن در یک اپلیکیشن توضیح داده شد. در این مطلب قصد داریم که با شرح جزئیات موارد زیر را مورد بررسی قرار دهیم:
– راه اندازی یک محیط تست و نوشتن تست های واحد برای کلاس های MVP
– پیاده سازی الگوی MVP با استفاده از تزریق وابستگی و با کمک Dagger 2
– تشریح نحوه جلوگیری از مشکلات رایج در استفاده از MVP در اندروید
1. تست واحد
یکی از بزرگ ترین مزایای استفاده از الگوی MVP تسهیل فرآیند تست واحد می باشد. کار را با نوشتن تست هایی برای کلاس های Model و Presenter که در بخش نهایی مطلب قبلی ساخته بودیم آغاز می نماییم. اجرای تست های نوشته شده را توسط Robolectric که یک فریم ورک تست واحد است به انجام می رسانیم. به منظور ساخت آبجکت های تقلیدی، Mockito را استفاده می کنیم که ما را قادر به تایید در صورت فراخوانی متدهای خاص می گرداند.
گام 1: راه اندازی
فایل build.gradle از ماژول اپلیکیشن خود را ویرایش کرده و وابستگی های زیر را به آن بیفزایید.
   //…
    testCompile 'junit:junit:4.12'
    // Set this dependency if you want to use Hamcrest matching
    testCompile 'org.hamcrest:hamcrest-library:1.1'
    testCompile "org.robolectric:robolectric:3.0"
    testCompile 'org.mockito:mockito-core:1.10.19'
}
در داخل فولدر src پروژه فولدرهایی به صورت [/java/[package-name]/[app-name بسازید. پس از آن یک پیکربندی دیباگ ساخته و بسته تست را به اجرا در آورید. بر روی Edit Configurations در قسمت بالا کلیک کنید.

با کلیک بر روی دکمه + گزینه JUnit را از فهرست نمایش داده شده برگزینید.
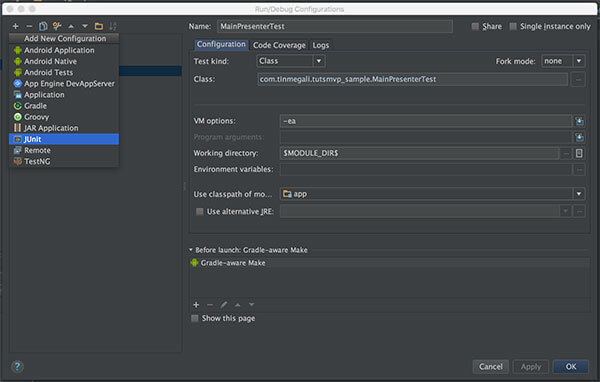
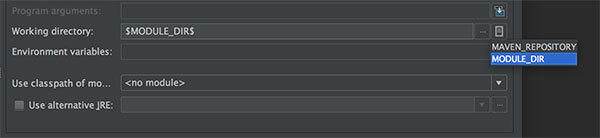
Working directory را به $MODULE_DIR$ ست کنید.
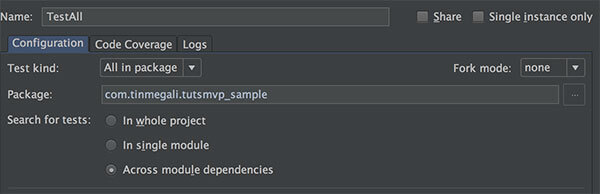
این پیکربندی برای تمامی تست های واحد به اجرا در می آید. Test kind را به All in package ست کرده و در فیلد Package نام پکیج را وارد کنید.
گام 2: تست کردن Model
حال فرآیند تست با استفاده از کلاس Model را آغاز می کنیم. تست واحد با استفاده از RobolectricGradleTestRunner.class که منابع موردنیاز برای تست عملکردهای خاص اندروید را در اختیار قرار می دهد، به اجرا در می آید. حاشیه نویسی config@ با گزینه های زیر اهمیت دارد:
@RunWith(RobolectricGradleTestRunner.class)
// Change what is necessary for your project
@Config(constants = BuildConfig.class, sdk = 21, manifest = "/src/main/AndroidManifest.xml")
public class MainModelTest {
    // write the tests
}
ما از یک DAO واقعی برای تست اینکه داده ها به درستی مورد استفاده قرار گرفته اند بهره می گیریم، برای دسترسی به یک Context، از کلاس RuntimeEnvironment.application استفاده می کنیم.
private DAO mDAO;
// To test the Model you can just
// create the object and and pass
// a Presenter mock and a DAO instance
@Before
public void setup() {
    // Using RuntimeEnvironment.application will permit
    // us to access a Context and create a real DAO
    // inserting data that will be saved temporarily
    Context context = RuntimeEnvironment.application;
    mDAO = new DAO(context);
    // Using a mock Presenter will permit to verify
    // if certain methods were called in Presenter
    MainPresenter mockPresenter = Mockito.mock(MainPresenter.class);
    // We create a Model instance using a construction that includes
    // a DAO. This constructor exists to facilitate tests
    mModel = new MainModel(mockPresenter, mDAO);
    // Subscribing mNotes is necessary for tests  methods
    // that depends on the arrayList
    mModel.mNotes = new ArrayList<>();
    // We’re reseting our mock Presenter to guarantee that
    // our method verification remain consistent between the tests
    reset(mockPresenter);
}
حال زمان تست متدهای Model است.
// Create Note object to use in the tests
private Note createNote(String text) {
    Note note = new Note();
    note.setText(text);
    note.setDate("some date");
    return note;
}
// Verify loadData
@Test
public void loadData(){
    int notesSize = 10;
    // inserting data directly using DAO
    for (int i =0; i<notesSize; i++){
        mDAO.insertNote(createNote("note_" + Integer.toString(i)));
    }
    // calling load method
    mModel.loadData();
    // verify if mNotes, an ArrayList that receives the Notes
    // have the same size as the quantity of Notes inserted
    assertEquals(mModel.mNotes.size(), notesSize);
}
// verify insertNote
@Test
public void insertNote() {
    int pos = mModel.insertNote(createNote("noteText"));
    assertTrue(pos > -1);
}
// Verify deleteNote
@Test
public void deleteNote() {
    // We need to add a Note in DB
    Note note = createNote("testNote");
    Note insertedNote = mDAO.insertNote(note);
    // add the same Note inside mNotes ArrayList
    mModel.mNotes = new ArrayList<>();
    mModel.mNotes.add(insertedNote);
    // verify if deleteNote returns the correct results
    assertTrue(mModel.deleteNote(insertedNote, 0));
    Note fakeNote = createNote("fakeNote");
    assertFalse(mModel.deleteNote(fakeNote, 0));
}
در این مرحله قادر به اجرای تست Model و بررسی نتایج هستید، علاوه بر این می توانید سایر جنبه های کلاس را نیز بیازمایید.
گام 3: تست Presenter
در این مرحله تمرکز خود را بر روی تست Presenter می گذاریم. برای این کار به Robolectric نیاز خواهیم داشت تا بتوانیم از چندین کلاس اندروید مانند AsyncTask استفاده کنیم. پیکربندی بسیار شبیه به تست Model می باشد. ما از مقلدهای View و Model برای بررسی فراخوانی های متدها و تعریف مقادیر بازگشتی استفاده می نماییم.
@RunWith(RobolectricGradleTestRunner.class)
@Config(constants = BuildConfig.class, sdk = 21, manifest = "/src/main/AndroidManifest.xml")
public class MainPresenterTest {
    private MainPresenter mPresenter;
    private MainModel mockModel;
    private MVP_Main.RequiredViewOps mockView;
    // To test the Presenter you can just
    // create the object and pass the Model and View mocks
    @Before
    public void setup() {
        // Creating the mocks
        mockView = Mockito.mock( MVP_Main.RequiredViewOps.class );
        mockModel = Mockito.mock( MainModel.class, RETURNS_DEEP_STUBS );
        // Pass the mocks to a Presenter instance
        mPresenter = new MainPresenter( mockView );
        mPresenter.setModel(mockModel);
        // Define the value to be returned by Model
        // when loading data
        when(mockModel.loadData()).thenReturn(true);
        reset(mockView);
    }
}
جهت تست متدهای Presenter کار را با عملکرد ()clickNewNote آغاز می کنیم که مسئول ایجاد یک یادداشت جدید و ثبت آن در پایگاه داده با استفاده از AsyncTask می باشد.
@Test
public void testClickNewNote() {
    // We need to mock a EditText
    EditText mockEditText = Mockito.mock(EditText.class, RETURNS_DEEP_STUBS);
    // the mock should return a String
    when(mockEditText.getText().toString()).thenReturn(“Test_true");
    // we also define a fake position to be returned
    // by the insertNote method in Model
    int arrayPos = 10;
    when(mockModel.insertNote(any(Note.class))).thenReturn(arrayPos);
    mPresenter.clickNewNote(mockEditText);
    verify(mockModel).insertNote(any(Note.class));
    verify(mockView).notifyItemInserted( eq(arrayPos+1) );
    verify(mockView).notifyItemRangeChanged(eq(arrayPos), anyInt());
    verify(mockView, never()).showToast(any(Toast.class));
}
علاوه بر این می توانستیم یک سناریو را تست کنیم که در آن متد ()insertNote یک خطا را باز می گرداند.
@Test
public void testClickNewNoteError() {
    EditText mockEditText = Mockito.mock(EditText.class, RETURNS_DEEP_STUBS);
    when(mockModel.insertNote(any(Note.class))).thenReturn(-1);
    when(mockEditText.getText().toString()).thenReturn("Test_false");
    when(mockModel.insertNote(any(Note.class))).thenReturn(-1);
    mPresenter.clickNewNote(mockEditText);
    verify(mockView).showToast(any(Toast.class));
}
در نهایت، به تست متد ()deleteNote با نتایج موفق و ناموفق می پردازیم.
@Test
public void testDeleteNote(){
    when(mockModel.deleteNote(any(Note.class), anyInt())).thenReturn(true);
    int adapterPos = 0;
    int layoutPos = 1;
    mPresenter.deleteNote(new Note(), adapterPos, layoutPos);
    verify(mockView).showProgress();
    verify(mockModel).deleteNote(any(Note.class), eq(adapterPos));
    verify(mockView).hideProgress();
    verify(mockView).notifyItemRemoved(eq(layoutPos));
    verify(mockView).showToast(any(Toast.class));
}
@Test
public void testDeleteNoteError(){
    when(mockModel.deleteNote(any(Note.class), anyInt())).thenReturn(false);
    int adapterPos = 0;
    int layoutPos = 1;
    mPresenter.deleteNote(new Note(), adapterPos, layoutPos);
    verify(mockView).showProgress();
    verify(mockModel).deleteNote(any(Note.class), eq(adapterPos));
    verify(mockView).hideProgress();
    verify(mockView).showToast(any(Toast.class));
}
2. تزریق وابستگی با استفاده از Dagger 2
تزریق وابستگی یک ابزار بسیار خوب است که در دسترس توسعه دهندگان قرار گرفته، چنانچه با این مبحث آشنایی ندارید، مطالعه مقاله Kerry's article در این باره پیشنهاد می شود.
تزریق وابستگی سبکی از پیکربندی آبجکت است که در آن فیلدها و همکاران آبجکت توسط یک موجودیت خارجی ست می شوند. به بیان دیگر آبجکت ها توسط یک موجودیت خارجی پیکربندی می شوند. تزریق وابستگی یک جایگزین برای یک پیکربندی آبجکت می باشد. Jakob Jenkov
در این مثال تزریق وابستگی، Model و Presenter ساخته شده در خارج از View را می پذیرد و موجب می شود که لایه های MVP آزادانه تر مرتبط شده و جداسازی وظایف افزایش یابد.
در اینجا Dagger 2 که یک لایبرری بسیار خوب از گوگل است، جهت تزریق وابستگی مورد استفاده قرار می گیرد. راه اندازی آن بسیار ساده بوده و دارای گزینه های بسیار خوبی است و این امر آن را یک لایبرری نسبتا پیچیده گردانیده است.
تمرکز ما تنها بر روی بخش های مرتبط از لایبرری گذاشته شده و لایبرری با جزئیات کامل مورد بررسی قرار نمی گیرد. چنانچه مایل به دریافت جزئیات بیشتری درباره Dagger هستید، Kerry's tutorial و یا documentation را که توسط گوگل ارائه شده، مطالعه نمایید.
گام 1: راه اندازی Dagger 2
اول از همه کار را با آپدیت کردن فایل build.gradle و افزودن یک وابستگی آغاز کنید.
dependencies {
    // ...
    classpath 'com.neenbedankt.gradle.plugins:android-apt:1.8'
}
در گام بعدی فایل build.dagger از پروژه را مشابه چیزی که نمایش داده شده ویرایش کنید.
apply plugin: 'com.neenbedankt.android-apt'
dependencies {
    // apt command comes from the android-apt plugin
    apt 'com.google.dagger:dagger-compiler:2.0.2'
    compile 'com.google.dagger:dagger:2.0.2'
    provided 'org.glassfish:javax.annotation:10.0-b28'
    // ...
}
پروژه را همگام سازی کرده و منتظر تکمیل فرآیند بمانید.
گام 2: پیاده سازی MVP با استفاده از Dagger 2
کار را با ساخت یک scope@ برای کلاس اکتیویتی آغاز می کنیم. یک annotation@ با نام scope بسازید.
@Scope
public  @interface ActivityScope {
}
در مرحله بعد بر روی یک module@ برای MainActivity کار می کنیم، چنانچه دارای چندین اکتیویتی هستید، لازم است تا یک Module@ برای هر اکتیویتی در اختیار قرار دهید.
@Module
public class MainActivityModule {
    private MainActivity activity;
    public MainActivityModule(MainActivity activity) {
        this.activity = activity;
    }
    @Provides
    @ActivityScope
    MainActivity providesMainActivity() {
        return activity;
    }
    @Provides
    @ActivityScope
    MVP_Main.ProvidedPresenterOps providedPresenterOps() {
        MainPresenter presenter = new MainPresenter( activity );
        MainModel model = new MainModel( presenter );
        presenter.setModel( model );
        return presenter;
    }
}
علاوه بر این نیاز به یک Subcomponent@ برای ساخت ارتباط با Component@ اپلیکیشن که باید ساخته شود، داریم.
@ActivityScope
@Subcomponent( modules = MainActivityModule.class )
public interface MainActivityComponent {
    MainActivity inject(MainActivity activity);
}
لازم است تا یک Module@ و یک Component@ برای اپلیکیشن بسازیم.
@Module
public class AppModule {
    private Application application;
    public AppModule(Application application) {
        this.application = application;
    }
    @Provides
    @Singleton
    public Application providesApplication() {
        return application;
    }
}
@Singleton
@Component( modules = AppModule.class)
public interface AppComponent {
    Application application();
    MainActivityComponent getMainComponent(MainActivityModule module);
}
در نهایت به یک کلاس Application جهت مقداردهی اولیه تزریق وابستگی نیاز داریم.
public class SampleApp extends Application {
    public static SampleApp get(Context context) {
        return (SampleApp) context.getApplicationContext();
    }
    @Override
    public void onCreate() {
        super.onCreate();
        initAppComponent();
    }
    private AppComponent appComponent;
    private void initAppComponent(){
        appComponent = DaggerAppComponent.builder()
                .appModule(new AppModule(this))
                .build();
    }
    public AppComponent getAppComponent() {
        return appComponent;
    }
}
به یاد داشته باشید که نام کلاس را در فایل منیفست پروژه درج کنید.
<application
        android:name=".SampleApp"
        ....
</application>
گام 3: تزریق کلاس های MVP
در آخر می توانیم کلاس های MVP خود را Inject@ کنیم، تغییرات موردنظر در کلاس MainActivity اعمال می شوند. در حقیقت روشی را که model و Presenter مقداردهی اولیه می شوند تغییر داده ایم.
گام نخست تغییر تعریف متغییر MVP_Main.ProvidedPresenterOps است. این متغییر باید public باشد و حاشیه نویسی Inject@ را نیز به آن اضافه کنیم.
@Inject
public MVP_Main.ProvidedPresenterOps mPresenter;
به منظور راه اندازی MainActivityComponent قطعه کد زیر را اضافه کنید.
/**
 * Setup the {@link com.tinmegali.tutsmvp_sample.di.component.MainActivityComponent}
 * to instantiate and inject a {@link MainPresenter}
 */
private void setupComponent(){
    Log.d(TAG, "setupComponent");
    SampleApp.get(this)
            .getAppComponent()
            .getMainComponent(new MainActivityModule(this))
            .inject(this);
}
در این مرحله باید مقداردهی اولیه و مجدد Presenter را بسته به حالت آن در StateMaintainer به انجام برسانیم. با افزودن بخش زیر متد ()setupMVP را تغییر دهید:
/**
 * Setup Model View Presenter pattern.
 * Use a {@link StateMaintainer} to maintain the
 * Presenter and Model instances between configuration changes.
 */
private void setupMVP(){
    if ( mStateMaintainer.firstTimeIn() ) {
        initialize();
    } else {
        reinitialize();
    }
}
/**
 * Setup the {@link MainPresenter} injection and saves in <code>mStateMaintainer</code>
 */
private void initialize(){
    Log.d(TAG, "initialize");
    setupComponent();
    mStateMaintainer.put(MainPresenter.class.getSimpleName(), mPresenter);
}
/**
 * Recover {@link MainPresenter} from <code>mStateMaintainer</code> or creates
 * a new {@link MainPresenter} if the instance has been lost from <code>mStateMaintainer</code>
 */
private void reinitialize() {
    Log.d(TAG, "reinitialize");
    mPresenter = mStateMaintainer.get(MainPresenter.class.getSimpleName());
    mPresenter.setView(this);
    if ( mPresenter == null )
        setupComponent();
}
عناصر MVP هم اکنون دارای پیکربندی مستقل از View می باشند. کد به لطف استفاده از تزریق وابستگی نظم بیشتری دارد، با تزریق کلاس های دیگر مانند DAO می توانید کد را بیشتر از این نیز ارتقا بخشید.
3. پیشگیری از مشکلات رایج
در زیر مشکلات رایجی که باید سعی در جلوگیری از آنها شود، فهرست شده اند.
- همیشه پیش از فراخوانی View در دسترس بودن آن را چک کنید. View به چرخه حیات اپلیکیشن وابسته است و هر زمان که تمایل داشته باشید می توانید آن را از بین ببرید.
- به یاد داشته باشید که با ساخت View جدید یک رفرنس جدید را ارسال کنید.
- هر وقت که View از بین می رود، ()onDestroy موجود در Presenter را فراخوانی کنید. در برخی از موارد لازم است تا Presenter را از رویدادهای onStop و onPause نیز مطلع گردانید.
- در صورت کار با Viewهای پیچیده از چندین Presenter استفاده کنید.
- در صورت استفاده از چندین Presenter، ساده ترین راه جهت ارسال اطلاعات بین آنها بکار بردن ایونت باس می باشد.
- جهت غیرفعال نگه داشتن لایه View تا جای ممکن، از تزریق وابستگی جهت ساخت لایه های Presenter و Model در خارج از View استفاده کنید.
جمع بندی
این سری از مطالب آموزشی به پایان رسید و در آن به شرح الگوی Model View Presenter پرداخته شد. هم اکنون قادر به پیاده سازی الگوی MVP در پروژه ها، تست و بکارگیری تزریق وابستگی می باشید.
http://code.tutsplus.com برگرفته از
View Count: 3625
Short Link: http://apprv.ir/qtUL8
Meta Description: تست واحد و تزریق وابستگی با استفاده از الگوی MVP.
Image Index: http://appreview.ir/uploads/blog_17840-1.jpg


نظرات کاربران